




Dust 2 is one of the most legendary maps in Counter-Strike 2, known for its iconic layout and high-paced gameplay. Whether you're attacking or defending, mastering the right Dust 2 smoke lineups can give you a huge tactical edge.
In this Dust 2 smoke guide, we’ll cover the most effective smoke spots across Mid, A Site, B Site, and more. Learn the essential lineups every player should know to take control of the map and win more rounds. You can also visit our practice guide to learn how to enable a private server and use commands to practice the lineups mentioned here.
CS2 Dust 2 Mid Smokes
Mid control is one of the most important aspects of Dust 2, especially for T side. By using the right smokes in Mid, you can block off vision from CTs, deny early aggression, and set up safe transitions to short and tunnels. Here are the most useful Mid smokes every player should learn.
Xbox Smoke
Right of the wall at T-spawn, put your crosshair like shown in the image and then jump-throw.

The smoke will land to the right of the box and it will not extend through the door.

Mid Door Smoke
Instead of throwing the Xbox smoke, you can use this one. Stand directly in front of this small mark on the wall, look at it and then jump-throw.

The smoke will land in the doorway, fully blocking out the door.

Mid Door Smoke from Lower Tunnels
This smoke gives you cover to take short control. First, stand behind the wall.

Aim up at the bottom right of this window and left and right click throw. This means that you need to hold the left click button, then hold the right click, and then release to throw.

The result is this waterfall smoke.

Left CT Mid Smoke
This smoke blocks off anyone holding from the left side of CT spawn. This allows you and your team to safely go up to Cat. From the same position as above, aim just above the cables at the edge of the wall and left-click throw.

This the result, perfect cover to shift towards B Site and cat.

Mid to B Smoke
This smoke allows anyone to go to B site, completely blocking off vision from CT. Crouch behind Xbox, look at this spot and jump-throw.

The smoke reaches all the way to the top, so the CTs can’t see you.

CS2 Dust 2 A Site Smokes
Taking A site on Dust 2 can be tricky without the right utility. With these smokes, you can block off common CT angles like Long Corner, CT Spawn, and A Ramp, making your entry much safer. Use these lineups to execute from Long or Short and secure the bomb plant.
Long A Corner Smoke
This smoke allows you to safely come out in long. From T spawn line up exactly with this edge of the wall.

Aim at this pipe on the wall, right where this pattern ends at the bottom, and jump-throw.

The corner is smoked, CTs will now have a hard time peeking the door.

A Cross Smoke
Next up, if you want to safely come from long to A ramp, you can use this smoke. Stand to the right of the blue container, look up towards the sky and walls, and left-click throw a bit to the right in the sky, like in the picture:

No gaps will be left towards the CT spawn:

CT Spawn Smoke from Long
Right past the doors leading to long, walk up to here and stand in the middle of the lines between the boxes.

Aim just a bit top-right of this tip while crouched.

Next, stand up and left-click throw. The result is a fully blocked off CT spawn.

A Short Setup Smoke
A very simple but effective smoke that can be followed up with more smokes going into A site. First, stand in the middle of the door.

Aim at this hole in the wall and left-click throw.

The result is a very easy and effective smoke for going into A site from short.

CS2 Dust 2 B Site Smokes
B site is one of the hardest bombsites to retake, so entering it cleanly with good smokes is crucial. These smokes help you block off Window, Doors, and key angles CTs use to defend the site. With proper utility, you can reduce risk and take control of B more consistently.
Door Smoke & Window Smoke
Go to this bush in the corner and look up at the wall.

For the door smoke, look at the bigger hole in the picture and jump-throw.

For the Window Smoke, position the mouse directly on top of the tiny hole in the picture and also jump-throw.

This is the result when thrown together:

Lurk Smoke from Tunnels
This smoke causes a lot of pressure and attention, even if you decide not to follow it through. If you do, you can make plays with it by keeping to the left side and looking for an easy kill. Start by standing behind this pillar, on its left side.
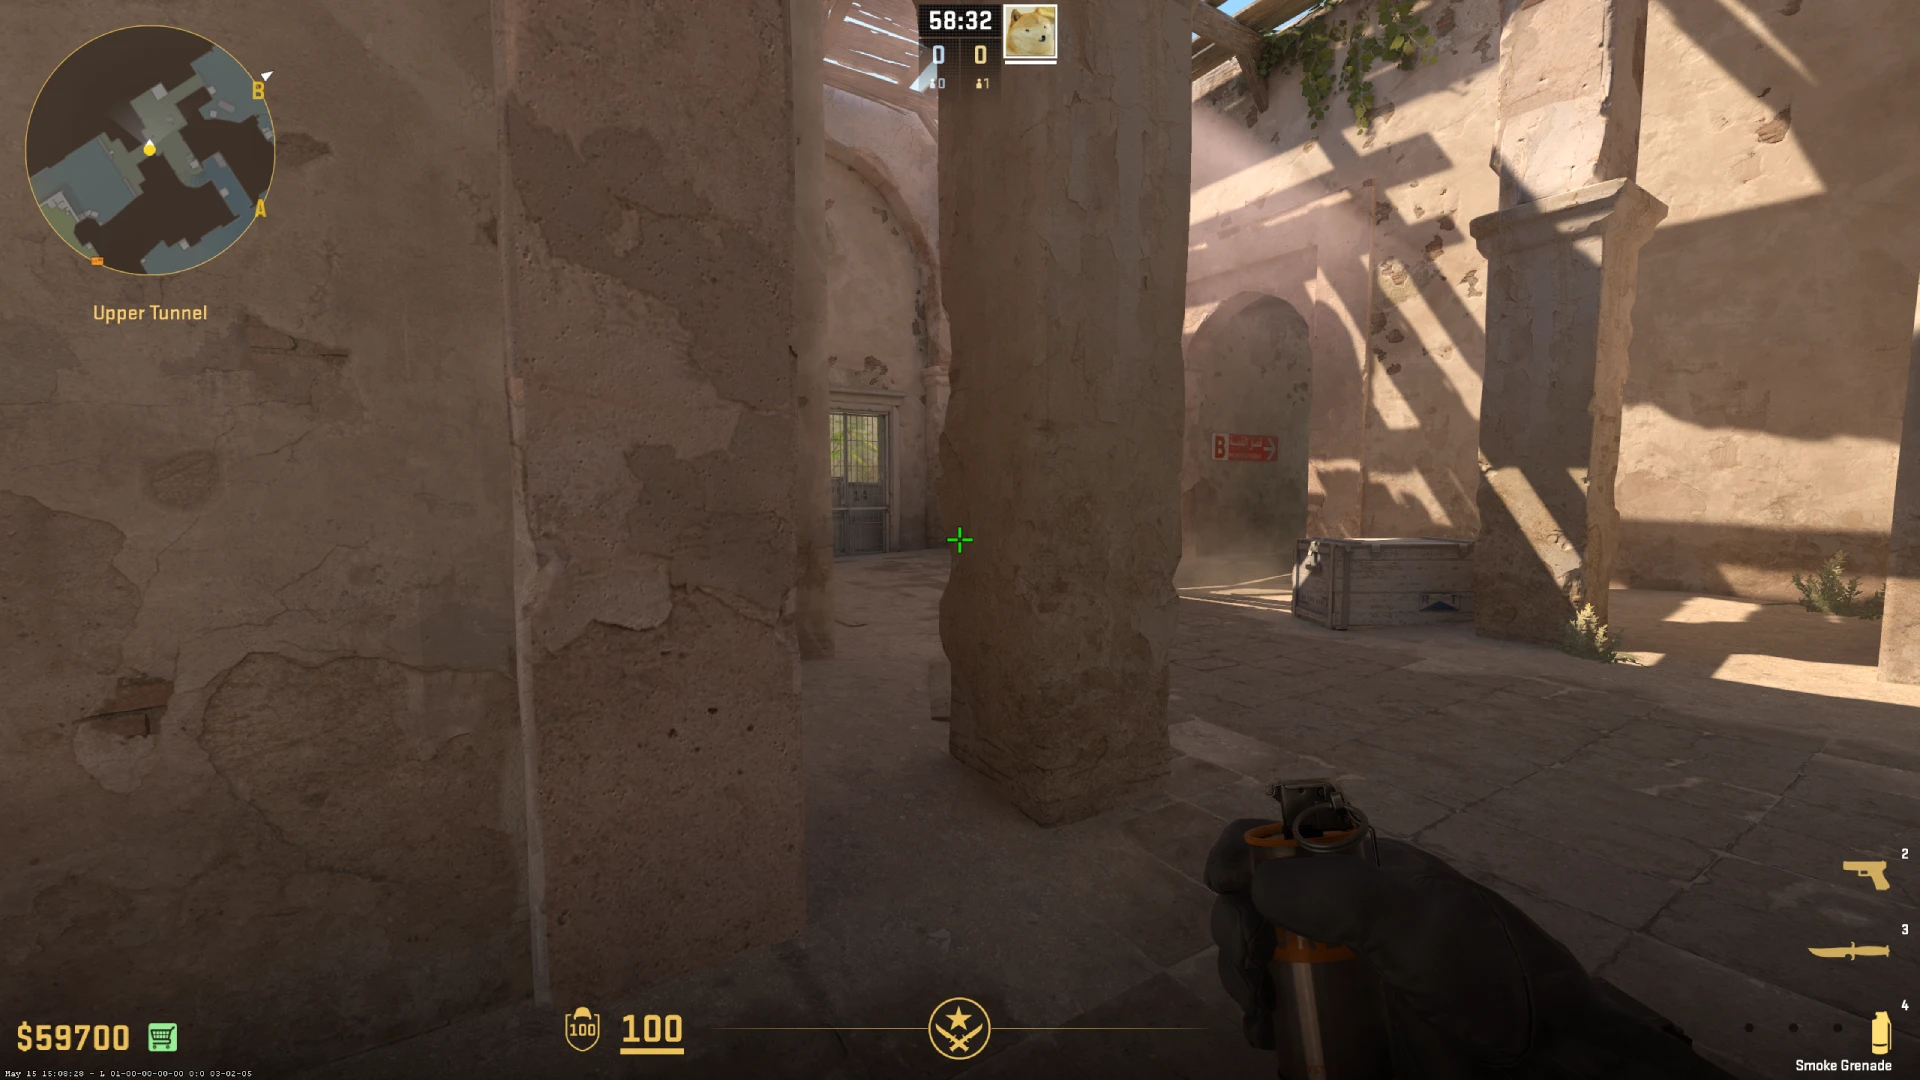
Next, look at the pattern on the wall as shown on the image. Luckily, this is one of the rare smokes where you don’t have to be very precise.

The finished smoke blocks off vision from B, puts pressure, and enables plays:

Conclusion
Knowing the best T side smokes on Dust 2 can completely change the outcome of your matches. From taking Mid control to executing clean pushes onto A and B sites, these lineups give you the upper hand in every round. Practice them regularly, communicate with your team, and you’ll see your win rate climb. For more CS2 smoke guides and tips, be sure to check out our other map breakdowns.